Group and Team Leader Reference Guide
Download PDFNew group or new account owner
New group: enroll as the account owner
A new group has no members yet. The person from the agency who will be the account owner enrolls first. The agency’s sub accounts attach to this member’s account, and the member self-signup URL is attached to this person’s account as well.
Account owners enroll using the link provided by American CME (ACME). They then request a role upgrade, which changes their initial subscriber role to a group leader role. The group leader role unlocks the reporting dashboard and the tools for assigning education to the group.
New account owner: enroll as a member and request a transfer
When the group already exists with members but ownership is changing hands, contact ACME Support at support@americancme.org to request a transfer of ownership. The new owner enrolls as a group member if they aren’t one already, and ACME upgrades their role and makes them the owner of the account and its sub accounts.
Add and remove members
Add a team leader
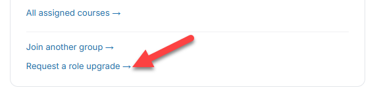
Team leaders enroll the same way a team member does — see Add team members below. Once enrolled in the group, team leaders request a role upgrade. Use the Request a role upgrade button on the My Dashboard › My Agency card to open the form (Figure 1).
Add team members
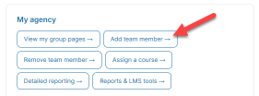
The group leader (account owner) and team leaders can enroll members into the group. On the leader’s My Agency card, click the Add team member button to get started (Figure 2).
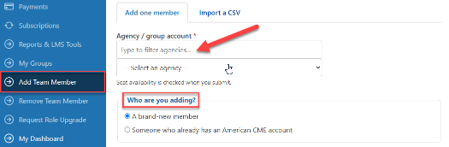
On the Add Team Member page (Figure 3), select the group. If you manage one group, its name is already there. Then select whether you are adding a brand-new member or someone who already has an account.
Many members use personal email addresses. Confirm which address is on their account and attach that one — this prevents duplicates and carries their CE history forward. It is fine if their existing account has other groups affiliated with it.
Member self-enrollment
New user without an ACME account — self-enrollment URL
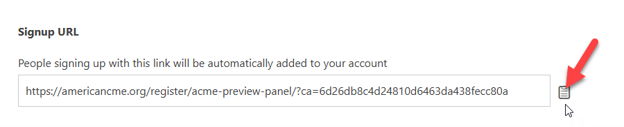
Provide new members with the self-enrollment URL. This URL is on the account owner’s Subscriptions › Sub Accounts page.
- Click View subscriptions in the Profile box on My Dashboard (Figure 4).
- On the Subscriptions page, click the three dots to reveal the Sub Accounts link (Figure 5).
- On the Sub Accounts page, copy the signup URL and paste it into an email (Figure 6).


Existing ACME user — access the URL on the My Groups page
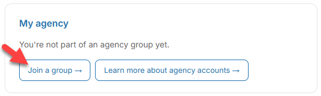
Your group’s member signup link is also available through the search tool on the My Groups page. Send the user to their My Dashboard page. A user with no group subscriptions has a Join a group button (Figure 7); a user who already belongs to a group has a Join another group link.
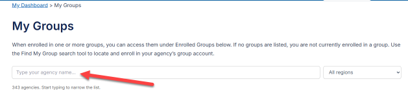
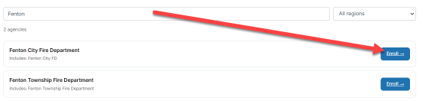
On the My Groups page, they can search for an agency by name or filter by region (Figure 8). Once they find the group, they click Enroll (Figure 9).
Remove a team member
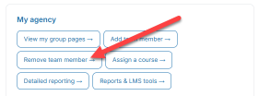
The group leader (account owner) and team leaders can remove a member from the group. On the My Agency card, click the Remove team member button to get started (Figure 10).
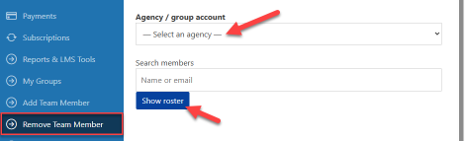
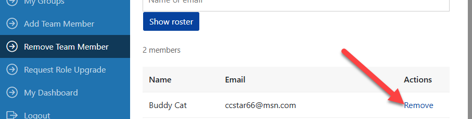
On the Remove Team Member page, select the group. If you manage one group, its name is already there. Type the member’s name or email address and click Show roster, or leave the search field blank and click Show roster to see everyone (Figure 11). Then click the Remove link next to the member’s name (Figure 12).
This removes the member from the sub account, expiring their sub account membership along with any groups or courses attached to it. It does not remove their course history or their access to transcripts and certificates.
Member self-removal
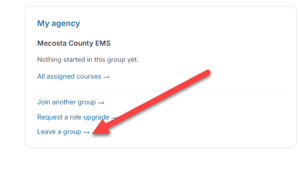
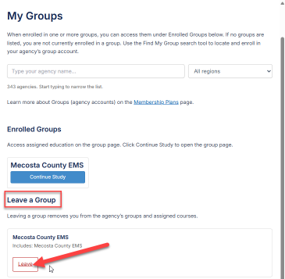
If a member enrolled in the group with two different accounts, they can remove one themselves. From the My Dashboard › My Agency card, the member clicks the Leave a group link (Figure 13). This opens their My Groups page, where the Leave a Group section has a Leave button (Figure 14).
Leaving removes access to the group page and its courses. It does not delete their course completion history or certificates.
Edit member profiles and change passwords
Edit a group member’s profile
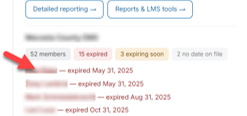
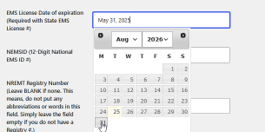
Does a group member have an expired license? Members with expired licenses are listed in the leader’s My Agency box (Figure 15). Click the member’s name to open their profile, select the date using the calendar tool (Figure 16), then scroll to the bottom of the page and click Update User (Figure 17).
Another route to a member’s profile
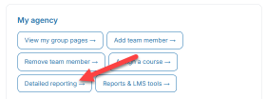
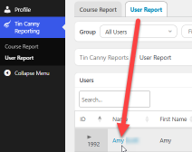
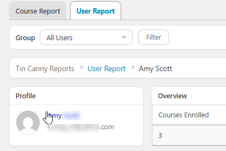
In the My Dashboard › My Agency box, click Detailed Reporting (Figure 18). On the User Report, search for the member and click their name (Figure 19). Then click their name again in the Profile box (Figure 20). This opens the profile page, ready to edit — see Edit a group member’s profile and Figure 16 for the next steps.
Change a member’s password
If a member doesn’t receive a password reset, check which email address their account uses — either on the roster on the Remove Team Member page, or on the Tin Canny User Report. If they have an account and are affiliated with your group, you can change their password from the LearnDash Groups Plus dashboard.
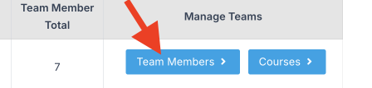
- Click Team Members (Figure 21).
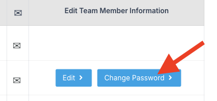
- Next to the member’s name, click Change password (Figure 22).
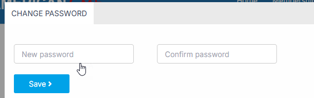
- Enter the new password and save (Figure 23).
Add or remove courses
Add or remove courses from the group
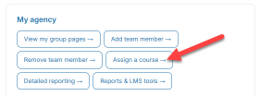
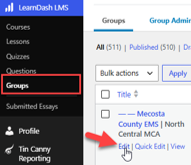
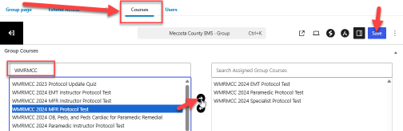
To add or remove a course, click the Assign a Course button on the My Agency card (Figure 24). On the LearnDash LMS Groups page, click Edit under the group name (Figure 25). In the editor, select the Courses tab, search for and select the course, and use the arrow to move it into the Assigned Group Courses box. Click Save (Figure 26). To remove a course, do this in reverse.
View reports
See who has or hasn’t completed a test
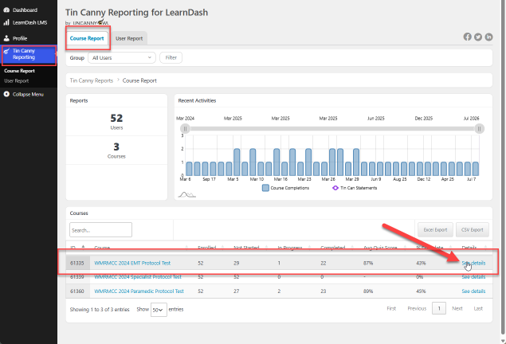
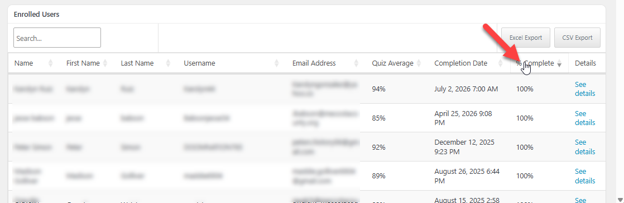
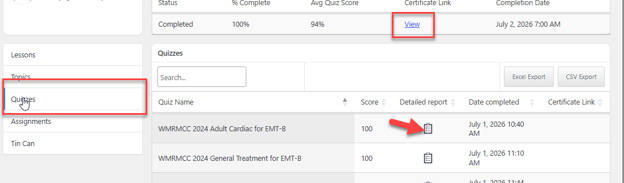
In the My Agency box, click Detailed Reporting (Figure 27). On the Tin Canny Reporting dashboard, stay on the Course Report page and click See Details next to the name of the course (Figure 28). Click the % Complete column heading to sort the list of users by completion (Figure 29), then click See Details to open a specific user’s results. The Quizzes tab shows their results with a detailed report of the specific questions answered (Figure 30).
New Protocol Section Scores report
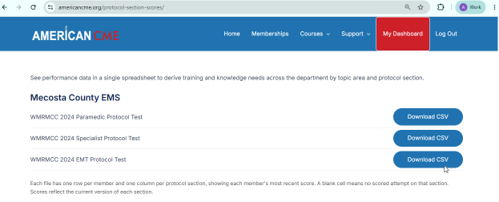
For tests delivered in sections based on protocols or topics, use the Protocol Section Scores report to compare section scores across all members in the group. Click Download CSV to view the report (Figure 31).